The question was – what to replace the 392 with? A very difficult question, for sure as the 392 was a fine running combo when it worked. Should I replace it with another Ford crate motor? With no warranty from Ford, a crate motor was not a sensible replacement choice. In a Second Strike issue I read about Dr. Mike Stenhouse’s search for the “Ultimate Windsor”. After much experimentation and cooperative effort between Dr. Stenhouse and RDI, Mike eventually settled on an all-aluminum 351” block, bored and stroked to give 427 cubic inches. The aluminum block is different than the conventional “Sportsman” 351”iron block in that the maximum bore can be 4.125” rather than 4.030” so the stroke can be held to 4.000”, not longer, as is required with the Windsor “Sportsman” block. Also, the engine as a total package, is a lightweight, being 80 pounds lighter than a cast iron 351, 180 pounds lighter than a 427 FE, and 240 pounds less than a 460. I was able to get a test ride in Mike’s Cobra and was impressed with the total package. There are several manufacturers of this type of big block small block engine. However, I settled on the 427 as built by RDI, Cornelius, North Carolina, based on verbal recommendations from satisfied users rather than advertising “hype” from other manufacturers. The block has four bolt mains, and the best of everything is installed, so should hold up to some serious use. Although pricey, at $16,400, the investment is worth it if you consider the cost of a second replacement Ford crate motor. The aluminum block 351W/427 is pretty sturdy and by all accounts should be as reliable as its cast iron counterpart. Only time will tell. The installation was a straightforward bolt in. We installed the engine with the transmission attached. It makes the install a little tricky, but I think it is easier than struggling to install the transmission after the block is lowered into the engine compartment. You don’t have to worry about supporting the engine while installing the transmission. While installing the engine, I took the opportunity to replace the old Lakewood scatter shield with a more modern aluminum bell housing using the clutch fork pivot point of later models. Clutch pedal effort is much improved over the old design. One thing that we did notice was that the new bell housing opening to receive the transmission was a tight fit. The transmission mated to the bell housing and stopped about one inch before it fully seated. At first I thought the pilot bearing and input shaft were a different size, or that the pressure plate was off a bit. Fortunately, we lubed the mating surfaces of the bell housing and transmission and it seated “snugly”. It would have been difficult to install the transmission in the car after the engine was installed with that tightness problem. There were no surprises, as the replacement engine basically came complete. The exhaust manifolds bolted right up to the Edelbrock heads. That was about it. To RDI’s credit, the install was a direct bolt-in, an important consideration. Part of the critical break-in procedures, as requested by RDI, required that you remove the distributor (after you index it so that it can be returned to the same position) and use a speed wrench to turn the oil pump impeller shaft to “prime” the system with oil. I have never done this before, so I was eager to follow RDI president Preston Miller’s direction. His idea is that “cranking” a new engine to prime the system using the starter motor in an intermittent fashion (rather than priming it by hand) is not recommended as this allows the last bearings and hydraulics to turn “dry” before getting oil. Also, the plugs were removed and a “shot” of Marvel Mystery Oil was used to lube the top end prior to firing up the motor. As a side note, I can’t stress enough the importance of indexing the distributor prior to removing it, as it can be a bear to replace it if you are not exactly sure how it came out. I took a sharp screwdriver and “punched” a witness mark on the aluminum block and distributor shoulder next to the block. Also, with the distributor cap removed, I placed a “paint dot” on the part of the distributor housing adjacent to the direction of the rotor. After priming the system by hand using the speed wrench, the distributor was easily returned to almost exactly the same spot. As was my experience, it fired up immediately, which was a good thing. I ran the engine until it was warm, and then timed it to exactly 30 degrees (vibration damper was marked by RDI) at 3000 rpm. This brings me to another critical point. The vibration damper used on the 427 is the same as the vibration damper as is used on the 392. To confuse things even more, there are Two (!!!) sets of timing marks on this vibration damper. Apparently, this type of vibration damper has multiple applications (Ford Motorsport 0095367). The vibration damper is degreed from 0º to 40º. There is a circled A (see image) located near the 20º mark. An identical second set of degree numbers is located at about two o’clock from the first set and has an identifying circled B located near it’s 20 ºmark. Make sure you use the FIRST set of degree numbers that has the circled A near the 20 degree mark, if your vibration damper is NOT marked or the mark has been worn off. I was always used to vibration dampers only having one set of degree marks on them!!! One thing I noticed upon initial start up was that gas was pouring out of the primary booster venturi indicating that the initial float level as delivered was incorrect. I reset the float level and checked both the primary and secondary levels through the sight holes. That was it. This particular motor was supplied with a chokeless Holley 750 HP with double accelerator pumps and mechanical secondaries. This was my choice, as I do not care for vacuum secondaries. I like to control the opening of the secondaries myself. Cold start up is usually not a problem despite not having a choke. My previous 392 had the choke wired open permanently. After a minute of rough running the engine ran OK. The 427 break in procedure was minimal, as most of it was done on the dyno down at RDI. Incremental maximum engine speed increases and distances driven are spelled out by RDI, and I followed them to the letter. With the kind of money I spent on this motor I was not about to take any shortcuts. The specification sheet supplied with the engine showed that the 427 pumped out a whopping 532 horsepower at 5900 rpm and 535 lb/ft torque at 4300 rpm. The power is absolutely awesome. The additional 100 horsepower over the 392 really makes a difference. I was shocked when I wound it out to 5000 rpm for the first time!!! When I hit third gear the wheels were spinning. In fact, it has so much power that I will have to admit that it is really more than I need. I was cautious and very careful not to spin out in third gear while accelerating – nice to be able to say that!!! Anyway, the power level should be sufficient to satisfy most people’s needs. I was concerned about heat build up, based on unsubstantiated rumors from other sources. So far, the 427 runs hardly any hotter than the 392. In fact, it seems to run cooler. Next summer will be the acid test. Additionally, Superformance did it right by using the largest possible radiator. Contrary to what others say, the 427 does NOT generate any more heat than either a 427 FE or the 460. RDI’s president, Preston Miller, is very nice to deal with. Unlike Ford, RDI offers a 2 year, 24,000 mile warranty with the engine. This was one of the main reasons that I went with RDI, and also why I followed his break in procedure “to the letter”. Roush, Coast High Performance and others also offers a similar warranty. Ford does not offer any warranties with their crate engines. |
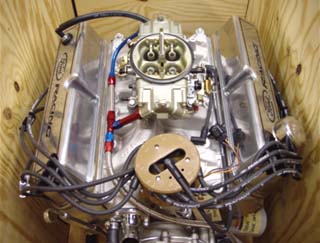
The RDI 427 Windsor motor as delivered in its crate. Output is 540 horsepower at 5800 rpm. This particular engine has an aluminum 4 bolt main block and weighs 80 pounds less than a 351Windsor iron block and 180 pounds less than the 427 FE.
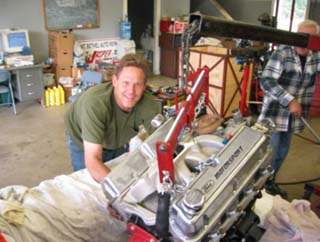
The 392 is being removed with the transmission attached. With a chain hoist that has a balancing device (obtained from the Summit catalog), the transmission can be angled to slip into the engine bay. Very easy.
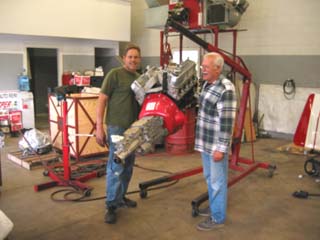
I took a sharp screwdriver and “punched” a notch on the block AND distributor collar so that I could return the distributor to its original location, prior to start up. Although not too clear on the image to the left, there are two small screwdriver” punch marks” next to the lock down bolt that allow the exact return of the distributor.
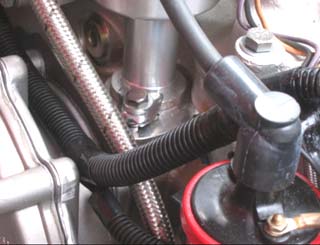
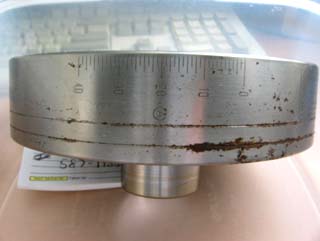
Notice that the vibration damper has a circled “A” next to the 20 degree number. There is similar second set of numbers on this vibration damper. Make sure you use the FIRST set (with the circled A) to set your initial timing. |